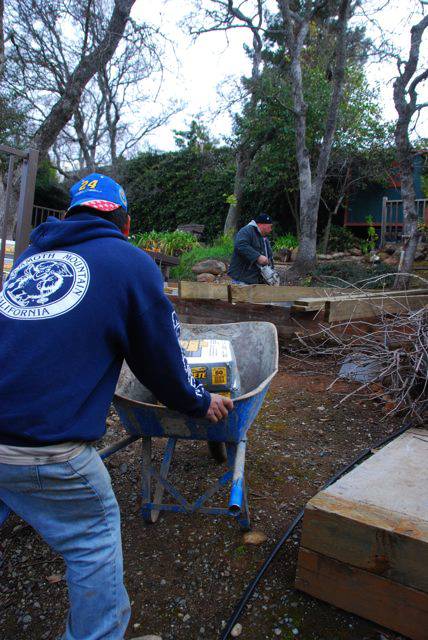
MARCH 1, 2010
The first step in building the observatory was to find a site to put it. While we are very close to dark skies, the plan was to put the observatory in the backyard, and get experience in operating it "remotely". THEN possibly move it to a dark sky site. The wife didn't want to spoil our grass area, and have the dome visible from the house or main patio, so we built it over a sandbox that had been put in by the former owner. After drawing some plans, I began by digging a big hole - about 3' (1m) square. This hole will be filled with over one ton (1000 Kg) of concrete. |  |
 |
We live on a hill that is almost entirely granite, with huge boulders and very little normal soil. After digging through the sand portion of the sandbox, we hit dirt and rock. It took quite some effort to pull out all of the rocks and fashion a relatively square hole. Originally, I had planned to run PVC through the concrete to bring wires to the scope; but then decided that it wasn't necessary, as I could bring wires under the floor and up to the scope next to the pier. |
| Unfortunately, the selected site had many oak trees blocking the sky (a perfect place to put an observatory!) ... so we had to do some major tree trimming to 'carve out a hole in the sky' through which to observe. It was too bad that the trees had to be cut back or removed, but that was the price to pay for us to have some visibility of the sky. We can see from East to West through South ...but have to look through trees to see to the North. Fortunatley, most objects are in the Southern part of the sky. |  |
 | MARCH 4, 2010
After designing the deck (first time I had ever built anytning that big!), we went to our local Lowes, rented one of their trucks, and bought the deck supplies - treated lumber, deck blocks, deck boards, and the concrete for the pier. Fortunately, Lowes loaded the stuff on the truck for us. |
| I unloaded the lumber, but we were able to hire the Lowes guy to come by the house and unload the 30 bags of concrete into the garage. |  |
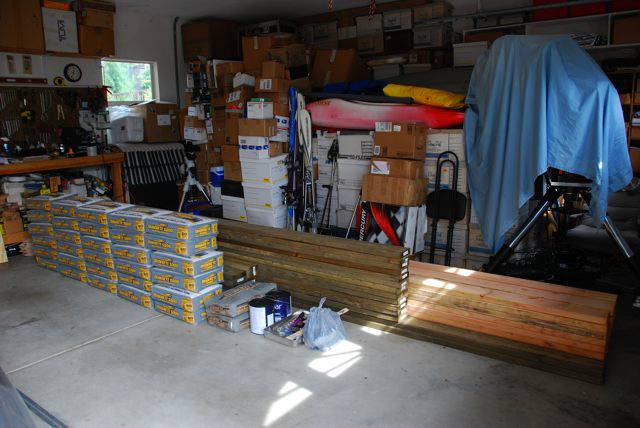 | Doesn't look like a lot, but it sure was heavy! We're all set to prepare the pier base and build the deck. You can see my scope (12" LX200R OTA on Paramount, mounted on a Meade Giant Field Tripod which is sitting on wheely bars - that also hold all of the electronics for imaging). Yes, our garage is a mess ... but we've actually cleared away boxes from 2 of the 3 bays, so we're making progress. (but building an observatory is MUCH more critical than cleaning the garage!) |
MARCH 5, 2010
Before pouring the concrete for the pier base, we needed to determine true North - i.e., the precise axis of the earth - so that we could mount the pier aligned close enough (it only has plus/minus 5 degrees of adjustment). I did this by building a tripod, hanging a plumb line, and marking the direction of the shadow at exactly the transit time of the sun (which I looked up on TheSky6). | 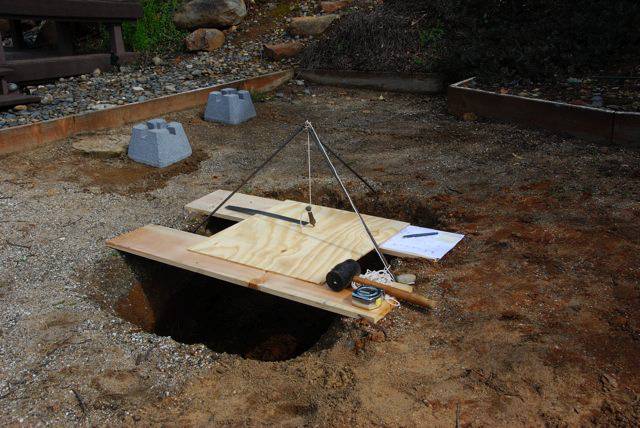 |
 | Here, you can see the plumb line hanging, and creating a shadow. As this photo was taken exactly at the transit time, the shadow is exactly North-South. Therefore, drawing this line on the board enabled me to line-up all of the bolt holes for the mount (which are on an 11" center for the Software Bisque permanent pier) so that the equatorial axis of the mount would be precisely aligned with the axis of the earth. I ended-up getting this right - to about 0.5 degree accuracy (it was very rewarding to see this weeks later after the observatory had been built and the telescope mounted; I had held my breath that my measurement was accurate ... and it was!) |
| I then had to start hauling materials up to the sandbox area to begin laying out the deck. Even though I had dug the hole according to the drawings I had made, I wanted to see the deck placed and lined up before pouring the concrete. If the concrete were poured in the wrong place, it would be HELL trying to get it back out! |  |
 | Although I had not had to lift any concrete bags getting them from Lowes to our garage, I thought I was going to have to haul those up to the construction site ... |
MARCH 6, 2010
... but fortunately, we found a concrete guy who wanted a small job, and he brought along his helper - who did all of the heavy lifting for us. So I never had to touch the bags of concrete! |  |
 | The concrete guy began cutting rebar to build a frame for the raised portion of the pier base. We also used rebar to hold the pier base to the ground (see next photos). |
| I learned a lot by watching the concrete guy teach his helper. The rebar was pounded into the ground, and then wired together, to make a cage that would provide strength for the raised portion of the pier base. | 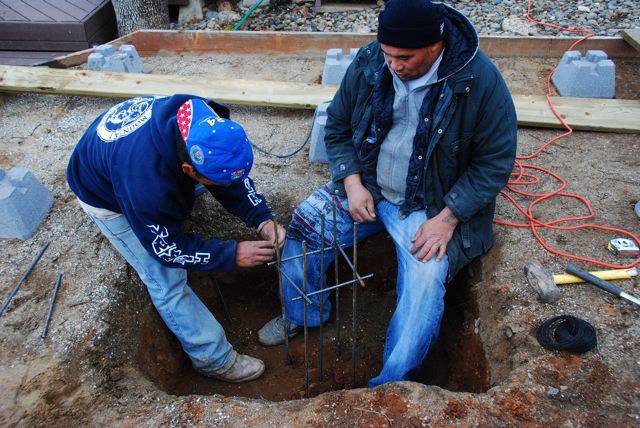 |
 | Finally, we were read to pour the concrete, and the helper began hauling the bags up to the construction site. If you've never tried lifting 80-pound bags of cement ... they are HEAVY! |
| The concrete was mixed in a wheelbarrow and poured by hand - by the helper. We used Quickcrete 5000, which is a high-strength concrete, and then strengthened it further with some pure Portland Cement. |  |
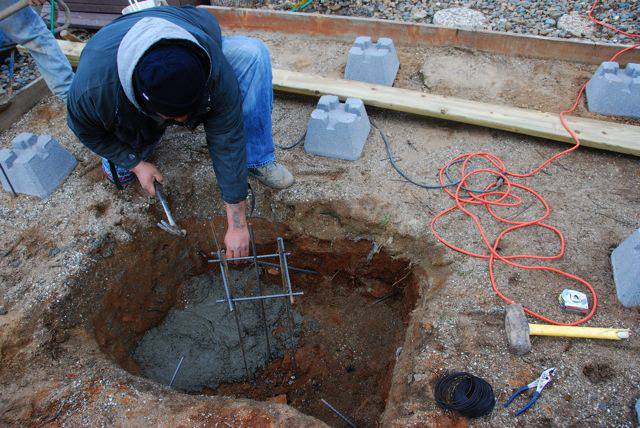 | While the first wheelbarrows of concrete were mixed and poured, the concrete guy pounded rebar into the sides of the hole, and then wired these to the main frame, in order to anchor the entire structure to the ground. My only question now, is what happens during an earthquake!?!? |
| It took a couple of hours, but the hole was finally almost filled with concrete. | 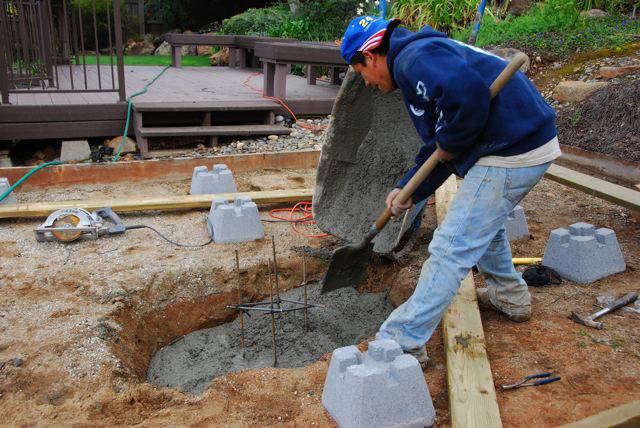 |
 | We then built a frame to hold the raised pier form in place, and carefully leveled the form. It was then screwed into place using the 2x6's which were also screwed to the stakes. In order to adjust the level, the concrete guy pounded on the stakes a bit, and this adjusted the form very precisely. Amazing the little things that you can learn by watching an expert! |
| Once the raised form was level, the helper began pouring concrete into it. It looks small (18x18" square), but took a lot of concrete to fill it. |  |
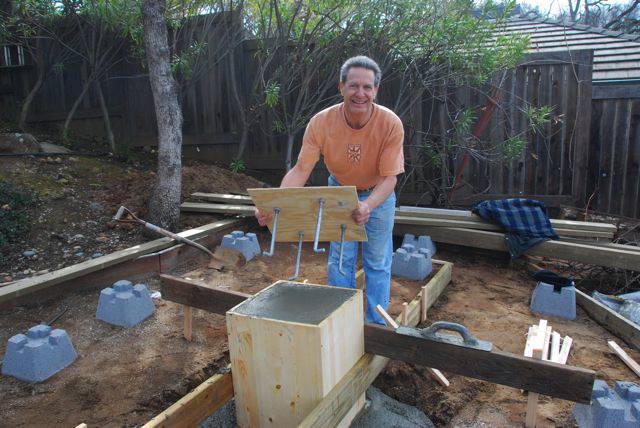 | It was finally time for the "piece de resistance" - the top form that I had built with the pier bolts carefully placed in the polar-aligned position. |
| I pushed the form down, with the 4 bolts going into the concrete. A little shaking ensured that there were no voids in the concrete near the bolts. I used 5/8" bolts, as the clearance on the pier was 3/4", and I wanted a little play, in case my measurements weren't exact. |  |
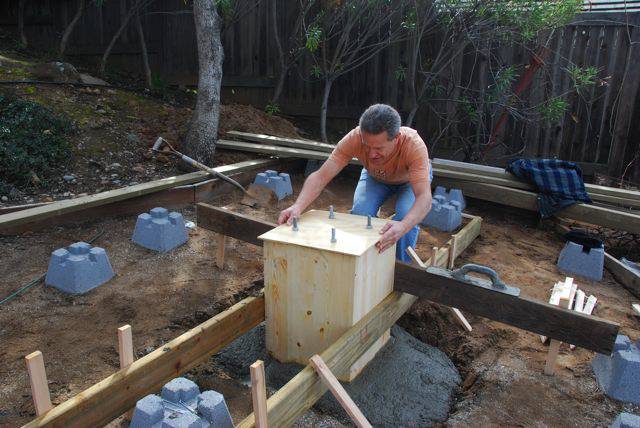 | The top form was in place, and squared with the raised form. Although the concrete guy said it wasn't necessary, I should have screwed this top form to the raised form, as the thin material warped when it touched the wet concrete, and lifted up a bit - so the top of my concrete pier base isn't exactly smooth. |
MARCH 7, 2010
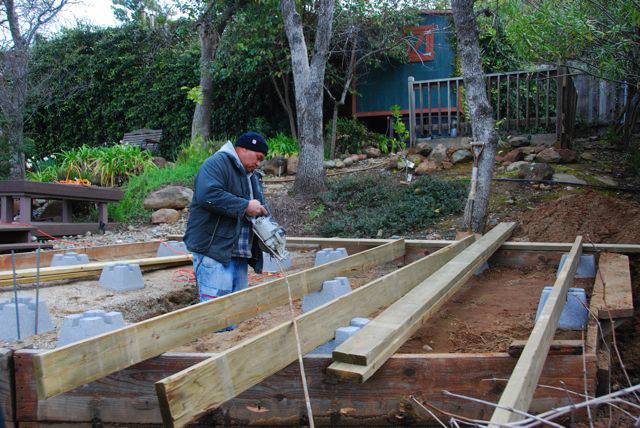
The next day, I started framing the deck. I started by leveling the deck blocks, but finally realized it would be much easier to just level the boards (cutting the 4x4's taller, and then adjusting the 2x6's up and down until they were level. It was quite a project to align all of the deck blocks ... and I forgot to use gloves, so ended-up with torn-up hands. Also, the posts didn't come out exactly on 24" centers, as I had planned ... but they are "close enough for government work". | 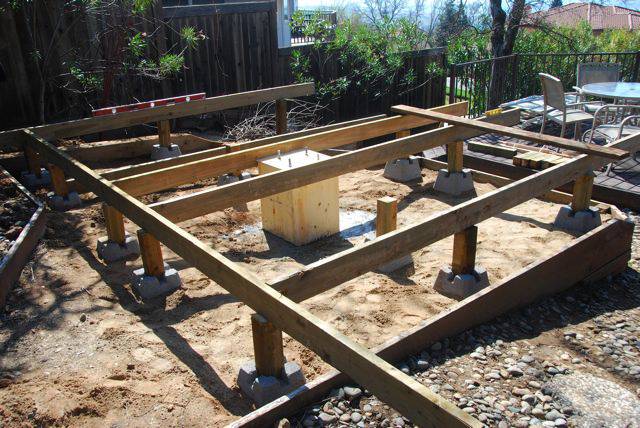 |
 | MARCH 8, 2010
The framing was finished, using (3) 3" coated deck screws per connection. After building the main part of the frame, I cut and screwed in blocking pieces to really strengthen the structure. |
The deck looks nice and square in this photo. Unfortunately, I made a major mistake: I based the deck on the sandbox (which I had assumed was square, but wasn't). So, two things happened: 1) The deck itself isn't square - so the final observatory doesn't line up with the deck on all sides 2) The deck is not square with our other decks (see next photo)
|  |
 | You can see in this photo that the new deck beams are not lined up with our existing deck. The slight angle is really disturbing to me, but I'm told that most other people don't notice ... |
MARCH 10, 2010
Before we could start on the observatory, we had to do a major tree-trimming job in order to open a hole for observing the sky. We are on a hill with lots of big oak trees, and it was very unfortunate that we had to cut one tree down, and cut major branches off another 3-4 trees. However, we still have quite a few trees left. |  |
 | Here you can see the view towards the East - and the trees blocking the view to the North. The little green building in the background is a playhouse, which I originally thought could be turned into an observatory, but there were just too many trees and plants from the neighbors that I would have to deal with. We'll probably turn the playhouse into a sauna some day. |
MARCH 11, 2010
I then had to prime the deck boards, so lined them up on the deck, and first figured out how they would fit together - as they all seemed to be warped. |  |
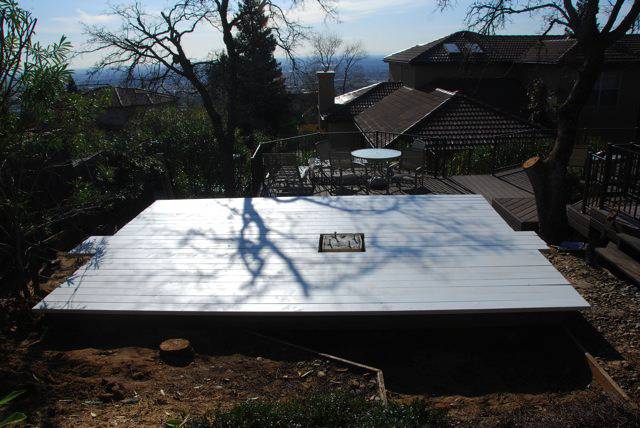 | The deck boards are now screwed down to the frame - using more than (300) 3" coated deck screws. Luckly, a neighbor lent me a professional drill, so that I could get these in without too much difficulty. You can see that my calculations (i.e., guess) were right on the money regarding height of the pier base - it's nearly flush with the deck level (which will be the approximate floor level of the observatory). |
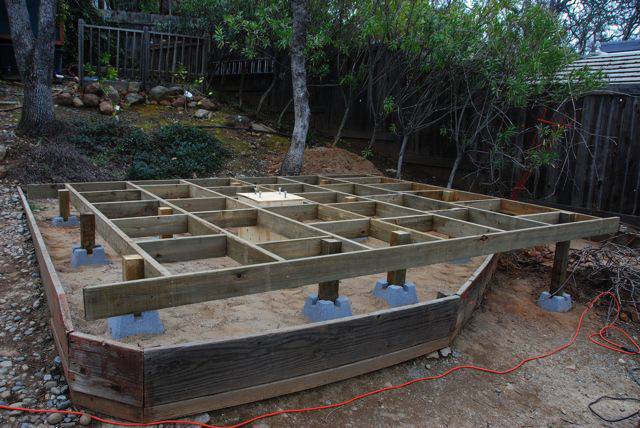
| Here is a view of the finished deck, waiting for the observatory to arrive. We will probably use the "criss-cross" material shown here around the base of the observatory to hide the deck blocks, framing, and sandbox. Looks like a great dance floor for our backyard ... but I'd rather put in an observatory. |  |
 | MARCH 15, 2010
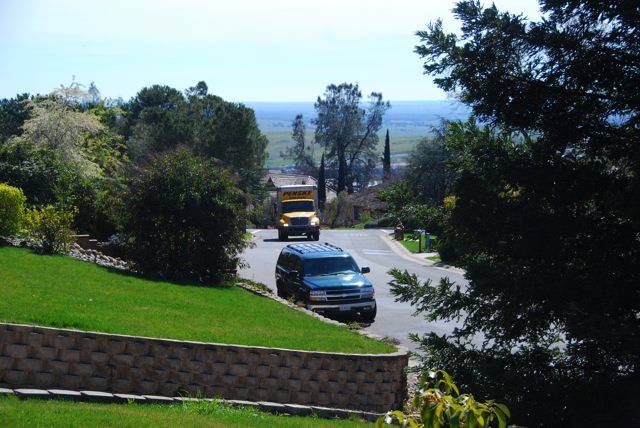
It was finally the day for the observatory to arrive! Troy Duval, who had built the observatory in his backyard in Dallas, TX, agreed to drive the observatory to California - nearly 2,000 miles (3,000Km)! I waited anxiously, as the truck made it up the hill to our house. |
| Boy, a 26' (8m) truck is big! I'm sure glad Troy did the driving. |  |
 | Troy looks in pretty good shape, after a 2.5 day epic drive from Dallas to El Dorado Hills. Looks like there is a lot of empty space in the truck ... |
| ... but it was mostly needed. Here you can see the 4 walls of the observatory, and the 2 sections of roof (on the far right), along with the dome - all tied down to the truck floor with 2x4s. | 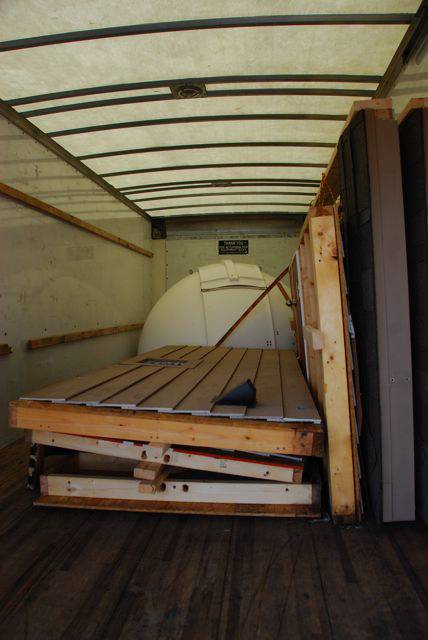 |
 | It was a BEAR to haul the four observatory walls up to the backyard - they were more than 200 lbs (90Kg) each. I was able to get a friend, a neighbor, and the strong, young guy from Lowes to help carry these from the street level up to the backyard - only about 100' (30m), but up a pretty steep hill. |
| You can see here the path up to the backyard. We had to remove the gate and part of the fence in order to get the walls, roof, and dome up to the construction site. |  |
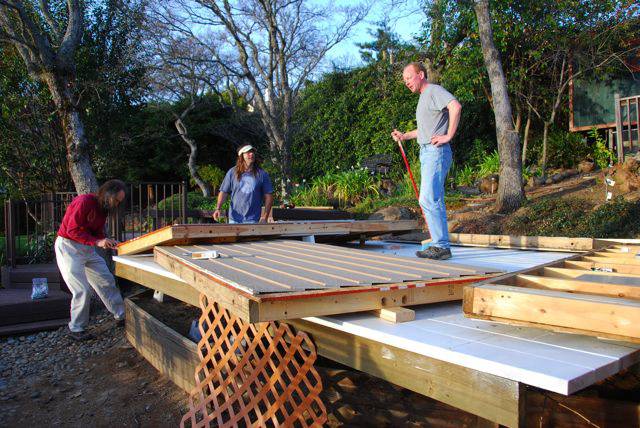 | Once we had the wall sections up on the deck, we had to figure out which order they go - we had them assembled and then had to swap two sections (and we thought the heavy lifting was over!) |
| We got the walls into place, and bolted them together. The observatory was built with moving it in mind. Troy ended-up building a larger observatory at his dark sky site, but I may very well move this someday to my own dark sky site. Once bolted together, we could slide the entire structure around on the deck to make sure the pier was centered. | 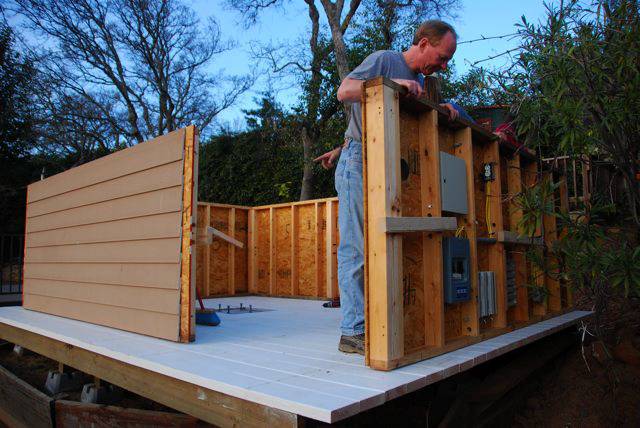 |
 | Late in the day (Troy had arrived around noon), we had the observatory walls up. Now for the REALLY heavy lifting - the roof sections that weighed over 300lbs (136Kg). |
MARCH 16, 2010
We carried the dome up the driveway, and gave it a good washing, before bringing it to the observatory. During this time, we were mounting the dome rings - which are a critical part of the structure, both needing to be level for the dome to turn properly, and needing to be sealed against water leakage in a heavy rain. |  |
 | As the roof had to be cut into two sections for transport, we needed to re-roof the seam. Here, Troy is showing me how to do a small roofing job - shingles, roofing caulk, etc. |
| The dome then had to be lifted into place. While the dome is relatively light (about 80lbs/36Kg), it was very bulky and difficult to lift from the ground all the way up to the top of the walls on the raised deck. |  |
 | But we quickly had the dome in place ... and it even rotated smoothly! That was the final proof of my level deck. Finally, this project is starting to take shape! |
We hooked up some temporary electrical, and opened the dome for the first time. LET THERE BE LIGHT! |  |
 | There was still a lot of work to do on the inside. Troy had done a great job of wiring, but we had to re-connect the dome computers, re-string the dome antenna wire, and put in some lighting. |
MARCH 17, 2010
By the end of the third day after Troy arrived, we had everything mostly in place. We put in some nice flooring, and installed the interior walls that Troy had built. Looks pretty neat at night! | 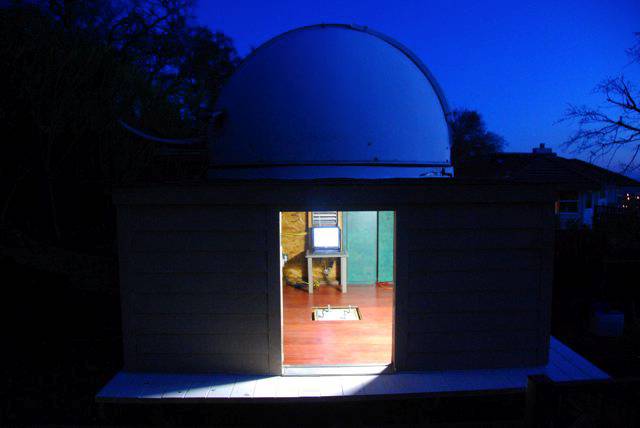 |
 | Here is the finished observatory (no pier or telescope, yet) at dusk, with the light of the Sacramento valley in the background. |
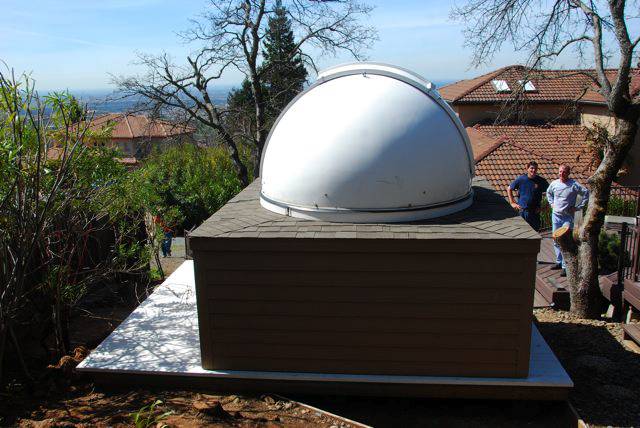
| Finished observatory in the daytime. Still need to caulk the corners, paint the deck, and ... find all the leaks! |  |
 | Here is how the observatory fits into our deck area (and shows the angle of the observatory from the other decks - now that I know what I'm doing, I could do it much better next time!) |
| Another view of the observatory in our garden. Not too obtrusive ... |  |
 | The observatory ready to image! Nice clear skies to the South (all the way from East to West).
[Unfortunately, between March 20 and April 2, while I was on an international trip, we had torrential rains, and found that the observatory was leaking everywhere. The good thing was that we did not have any equipment in it at that time. During the first week of April, 2010 I tracked down most of the leaks; the main one was coming through the joint between the two dome rings (that the dome sits on). There were still several days of rain in early April, so I was able to get inside the observatory and locate the leaks and plug them. By end of that week, I was confident enough of the watertightness of the observatory to start bringing in the equipment.] |
APRIL 7, 2010
I bought a Software Bisque permanent pier and installed that and the telescope in the observatory. Note that the screws from the concrete pier base were exactly the right size. The polar alignment came out to be about 0.5 degrees (which is easily correctable using the Paramount Az-El adjustments). The pier I bought was 24", as I wanted to be able to reach the top of the scope, and thought my imaging would be limited to 45 degrees elevation or higher. However, I hadn't taken into account the diameter of the scope, so at low elevatinons, the dome is cutting off the bottom of the view. Therefore, I will probably switch to a 30" pier. |  |
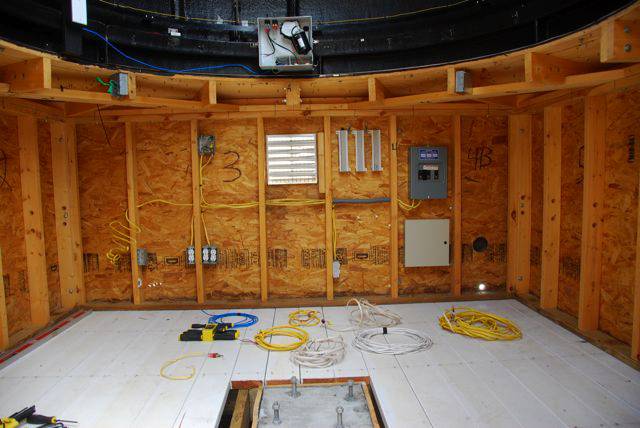
 | Inside of the observatory prior to mounting the electronics, power controller, etc.
|
I DID swap the 24" pier for a 36" pier - which places the center point of the mount almost exactly at the rotation point of the dome (center of the sphere). This allows a much lower horizon without the bottom half of the scope being blocked by the dome. It was somewhat tricky to set all the dome geometry parameters to get the dome to rotate so that the scope is centered in the slit. I finally got it working quite well - with mis-centering of only about 2" anywhere in the sky. | 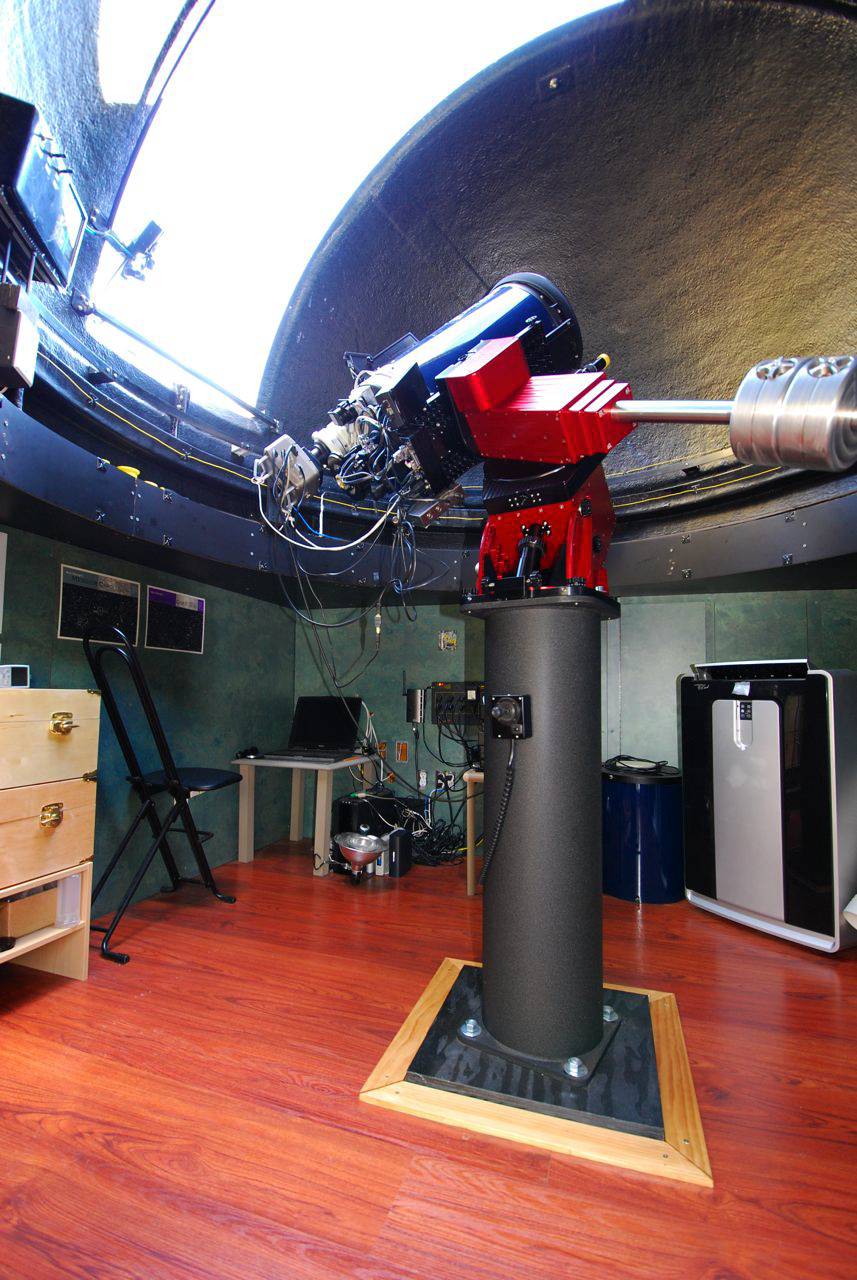 |
PLEASE SEE THE COMPLETED OBSERVATORY PAGE! | I installed the Digital Loggers internet power switch and the "mini-rack" of support equipment, which includes power supplies, AstroHub, RoboFocus controller, Airport Extreme WiFi base station, and digital logger for the weather station. The Dell AstroLaptop is seen in the corner sitting on a small table; this computer runs the entire observatory. The ONLY non-resolved issue is that I cannot remotely boot the computer after a power failure (I can cycle the power, but not startup the computer). I'll either end-up with a desktop that can do that, or perhaps hack the power switch on the laptop ... |